This tutorial deploys a highly available Kubernetes 1.27* cluster with:
- Cilium for the CNI + IP address ranges of your choosing
- Hubble for network monitoring
- containerd for the CRI
- HAProxy** for load balancing the API server
- on RedHat-like operating systems
*Cilium is unstable with Kubernetes above v1.27.
**I assume you have a basic HAProxy instance running.
Before you start
You’ll need 5 VMs. One for HAProxy, two for control plane hosts and two for workers. In this guide, HAProxy, control plane and worker commands look different:
echo "I'm a HAProxy command"echo "only run me on the control plane nodes, or a single node if the title says so"echo "run me on worker nodes only"Step 1: HAProxy for kubeapi.example.net
Make a DNS record for kubeapi.example.net however you normally would. Point it at your HAProxy server.
Edit /etc/haproxy/haproxy.cfg to add a frontend for port 6443 traffic:
frontend frontend_kubecp
  bind 0.0.0.0:6443
  mode tcp
use_backend backend_kubecpalso add a backend pointing to the two control plane servers:
backend backend_kubecp
  mode tcp
  balance roundrobin
  option forwardfor
  server kube1.example.net kube1.example.net:6443 check
server kube2.example.net kube2.example.net:6443 checkSave haproxy.cfg and reload:
systemctl restart haproxyCheck that your API server is reachable. You can do wget kubeapi.example.net:6443 (error 400 would be expected) or if you have the stats endpoint enabled in HAProxy you can see visually.


Step 2: prepare all Kubernetes nodes
This guide expects a modern Linux kernel that supports socket-LB. This means you can use cool eBPF features in Cilium, and you’ll need kernel v4.19.57, v5.1.16, v5.2.0 or greater. If you don’t want to upgrade your kernel, remove the line --skip-phases=addon/kube-proxy in the kubeadm init section.
Upgrading the Linux kernel on RHEL-based systems (incl. Almalinux/Rocky)…
# become root
su root # or sudo -i

# add the repo for elrepo.org where the kernel-ml module is hosted
rpm --import https://www.elrepo.org/RPM-GPG-KEY-elrepo.org
dnf install -y https://www.elrepo.org/elrepo-release-8.0-2.el8.elrepo.noarch.rpm

# do the install
dnf -y --enablerepo=elrepo-kernel install kernel-ml

# reboot
reboot
Repeat that for worker nodes too… same thing:
# become root
su root # or sudo -i

# add the repo for elrepo.org where the kernel-ml module is hosted
rpm --import https://www.elrepo.org/RPM-GPG-KEY-elrepo.org
dnf install -y https://www.elrepo.org/elrepo-release-8.0-2.el8.elrepo.noarch.rpm

# do the install
dnf -y --enablerepo=elrepo-kernel install kernel-ml

# reboot
reboot
Run this on all k8s nodes, regardless of worker/control plane type.
# become root
su root # or sudo -i

# disable SELinux
setenforce 0
sed -i 's/^SELINUX=enforcing$/SELINUX=permissive/' /etc/selinux/config

# disable and stop firewalld (trust me on this one, don't bother making rules - lxc bridge interfaces will waste your time later if you try)
systemctl stop firewalld
systemctl disable firewalld

# clear out any existing / old Kubernetes configs!
rm -rf /var/lib/etcd/*
rm -rf /etc/cni/net.d/*
rm -rf /etc/kubernetes/*

# turn off swap and disable on startup
swapoff -a
sed -e '/swap/ s/^#*/#/' -i /etc/fstab # comments out fstab lines containing 'swap'

# prepare yum
yum update -y
yum install -y yum-utils
yum-config-manager --add-repo https://download.docker.com/linux/centos/docker-ce.repo

# install docker/containerd
yum install -y docker-ce docker-ce-cli containerd.io --allowerasing
systemctl enable docker && systemctl start docker

# sort out cgroup driver
cat <<EOT> /etc/docker/daemon.json
{
  "exec-opts": ["native.cgroupdriver=systemd"],
  "log-driver": "json-file",
  "log-opts": {
    "max-size": "100m"
  },
  "storage-driver": "overlay2"
}
EOT

# reload docker
systemctl daemon-reload
systemctl restart docker

# Set up containerd
cat <<EOT > /etc/containerd/config.toml
[plugins."io.containerd.grpc.v1.cri".containerd.runtimes.runc]
[plugins."io.containerd.grpc.v1.cri".containerd.runtimes.runc.options]
SystemdCgroup = true
EOT
systemctl restart containerd

# prepare repos
cat <<EOF | tee /etc/yum.repos.d/kubernetes.repo
[kubernetes]
name=Kubernetes
baseurl=https://pkgs.k8s.io/core:/stable:/v1.27/rpm/
enabled=1
gpgcheck=1
gpgkey=https://pkgs.k8s.io/core:/stable:/v1.27/rpm/repodata/repomd.xml.key
exclude=kubelet kubeadm kubectl cri-tools kubernetes-cni
EOF

# install the binaries
yum install -y kubelet kubeadm kubectl --disableexcludes=kubernetes
systemctl enable --now kubelet

# set the KUBECONFIG environment variable
export KUBECONFIG=/etc/kubernetes/admin.conf
Then exactly the same for worker nodes…
# become root
su root # or sudo -i

# disable SELinux
setenforce 0
sed -i 's/^SELINUX=enforcing$/SELINUX=permissive/' /etc/selinux/config

# disable and stop firewalld (trust me on this one, don't bother making rules - lxc bridge interfaces will waste your time later if you try)
systemctl stop firewalld
systemctl disable firewalld

# clear out any existing / old Kubernetes configs!
rm -rf /var/lib/etcd/*
rm -rf /etc/cni/net.d/*
rm -rf /etc/kubernetes/*

# turn off swap and disable on startup
swapoff -a
sed -e '/swap/ s/^#*/#/' -i /etc/fstab # comments out fstab lines containing 'swap'

# prepare yum
yum update -y
yum install -y yum-utils
yum-config-manager --add-repo https://download.docker.com/linux/centos/docker-ce.repo

# install docker/containerd
yum install -y docker-ce docker-ce-cli containerd.io --allowerasing
systemctl enable docker && systemctl start docker

# sort out cgroup driver
cat <<EOT> /etc/docker/daemon.json
{
  "exec-opts": ["native.cgroupdriver=systemd"],
  "log-driver": "json-file",
  "log-opts": {
    "max-size": "100m"
  },
  "storage-driver": "overlay2"
}
EOT

# reload docker
systemctl daemon-reload
systemctl restart docker

# Set up containerd
cat <<EOT > /etc/containerd/config.toml
[plugins."io.containerd.grpc.v1.cri".containerd.runtimes.runc]
[plugins."io.containerd.grpc.v1.cri".containerd.runtimes.runc.options]
SystemdCgroup = true
EOT
systemctl restart containerd

# prepare repos
cat <<EOF | tee /etc/yum.repos.d/kubernetes.repo
[kubernetes]
name=Kubernetes
baseurl=https://pkgs.k8s.io/core:/stable:/v1.27/rpm/
enabled=1
gpgcheck=1
gpgkey=https://pkgs.k8s.io/core:/stable:/v1.27/rpm/repodata/repomd.xml.key
exclude=kubelet kubeadm kubectl cri-tools kubernetes-cni
EOF

# install the binaries
yum install -y kubelet kubeadm kubectl --disableexcludes=kubernetes
systemctl enable --now kubelet

# set the KUBECONFIG environment variable
export KUBECONFIG=/etc/kubernetes/admin.conf
Step 3: install Cilium CLI binary
# install go
yum install -y go

# install Cilium CLI binary
CILIUM_CLI_VERSION=$(curl -s https://raw.githubusercontent.com/cilium/cilium-cli/main/stable.txt)
GOOS=$(go env GOOS)
GOARCH=$(go env GOARCH)
curl -L --remote-name-all https://github.com/cilium/cilium-cli/releases/download/${CILIUM_CLI_VERSION}/cilium-${GOOS}-${GOARCH}.tar.gz{,.sha256sum}
sha256sum --check cilium-${GOOS}-${GOARCH}.tar.gz.sha256sum
tar -C /usr/local/bin -xzvf cilium-${GOOS}-${GOARCH}.tar.gz
rm -rf cilium-${GOOS}-${GOARCH}.tar.gz{,.sha256sum}
Step 4: kubeadm init (start the cluster)
Change the variables below to suit your environment:
YOUR_API_ENDPOINTPOD_NETWORK_CIDRSERVICE_CIDRSERVICE_DNS_DOMAIN
# ! only on the first control plane node !

# create the cluster using kubeadm

# set these variables:
YOUR_API_ENDPOINT="kubeapi.example.net" # a DNS record that resolves in your network
POD_NETWORK_CIDR="10.3.128.0/18" # IP addresses your k8s pods will use
SERVICE_CIDR="10.3.192.0/20" # IP addresses that your k8s services will use
SERVICE_DNS_DOMAIN="k8s.example.net" # svc 'x' becomes x.default.svc.k8s.example.net
# ends

# run kubeadm (it will not be instant)
kubeadm init \
	--upload-certs \
	--control-plane-endpoint "$YOUR_API_ENDPOINT:6443" \
	--pod-network-cidr $POD_NETWORK_CIDR \
	--service-cidr $SERVICE_CIDR \
	--service-dns-domain $SERVICE_DNS_DOMAIN \
	--cri-socket unix:///run/containerd/containerd.sock \
	--skip-phases=addon/kube-proxy # only if v4.19.57, v5.1.16, v5.2.0 kernel is present

	# verify the API server works (ignore pending coredns pods)
	kubectl get pods -n kube-system
Note down the two join commands (for more CP nodes, and for worker nodes)
Step 5: join the other control plane node
# ! only on the OTHER control plane node !

# join to the cluster using the join command `kubeadm init` gave us previously
kubeadm join kubeapi.example.net:6443 --token xxxxxx.xxxxxxxxxxxxxxxxxxxx\
      --discovery-token-ca-cert-hash sha256:xxxxxxxxxxxxxxxxxxxx\
      --control-plane --certificate-key xxxxxxxxxxxxxxxxxxxx
Step 6: join worker nodes and label them
# perform the join
kubeadm join kubeapi.example.net:6443 --token xxxxxx.xxxxxxxxxxxxxxx--discovery-token-ca-cert-hash sha256:xxxxxxxxxxxxxxxxxxxxxxxxxxxxxxxxxxxxxxxxxxxxxxxxxxxxxxxxxxxx# label the nodes as workers
kubectl label node worker1.example.net node-role.kubernetes.io/worker=worker
kubectl label node worker2.example.net node-role.kubernetes.io/worker=workerIn a few seconds, all nodes should be Ready. Check for yourself:
# check status of all nodes. 'NotReady' is normal as we haven't installed Cilium yet!
kubectl get nodes -o wide
Step 7: verify the API survives a reboot
Save yourself the headache later. Do a reboot to check everything comes up.
# reboot
reboot# check
export KUBECONFIG=/etc/kubernetes/admin.conf
kubectl get pods -n kube-systemIf you get an error like Unable to connect to the server: EOF, try the below
Troubleshooting kube-apiserver issues…
- is the firewall disabled?
- is swap disabled ? (
free | grep Swap) - is the
kubeletservice running? - anything obvious in
journalctl -xeu kubelet?
Step 8: install Cilium (container networking)
# install Helm (grabs the latest version from their official repo)
curl -fsSL -o get_helm.sh https://raw.githubusercontent.com/helm/helm/main/scripts/get-helm-3
chmod 700 get_helm.sh
./get_helm.sh
Time-waster warning: if you want to specify the podCIDR range, something seems wrong with the Helm method you may encounter on the Internet. It typically looks like the hidden section below.
bad stuff…
helm install cilium cilium/cilium \
  --namespace kube-system \
  --set k8sServiceHost=kubeapi.example.net \
  --set k8sServicePort=6443 \
  --set ipv4NativeRoutingCIDR=10.3.128.0/18 \
  --set clusterPoolIPv4PodCIDRList="10.3.128.0/18" \ # doesn't apply
  --set ipam.operator.clusterPoolIPv4MaskSize=24 \
  --set ipv4.enabled=true \
  --set kubeProxyReplacement=strict \
Don’t do that. Instead make a file called cilium.yaml and Cilium’s own cilium binary we just installed above to apply it (changing the # change me! lines):
version:
  1.15.4
namespace:
  kube-system
cluster:
  id: 0
  name: kubernetes
encryption:
  nodeEncryption: false
ipv6:
  enabled: false
ipam:
  mode: cluster-pool
  operator:
    clusterPoolIPv4MaskSize: 24
    clusterPoolIPv4PodCIDRList:
      - "10.3.128.0/18"
k8sServiceHost: kubeapi.example.net
k8sServicePort: 6443
kubeProxyReplacement: strict
ingressController:
  enabled: true
  default: true
operator:
  replicas: 1
serviceAccounts:
  cilium:
    name: cilium
  operator:
    name: cilium-operator
tunnel: vxlan
hubble:
  enabled: true
  ui:
    enabled: true # you should set up an ingress with an ingress controller later
  metrics:
    enabled:
    - dns:query;ignoreAAAA
    - drop
    - tcp
    - flow
    - port-distribution
    - icmp
    - http
    enableOpenMetrics: true
  peerService:
    clusterDomain: k8s.example.net
  relay:
    enabled: true
  tls:
    enabled: true
envoy:
  enabled: true
prometheus:
enabled: trueNow apply it:
# ! only on the first control plane node !

# install Cilium with cilium.yaml values
cilium install --helm-values cilium.yamlIf coredns pods don’t come up…
# ! only on the first control plane node !

# Try restarting coredns pods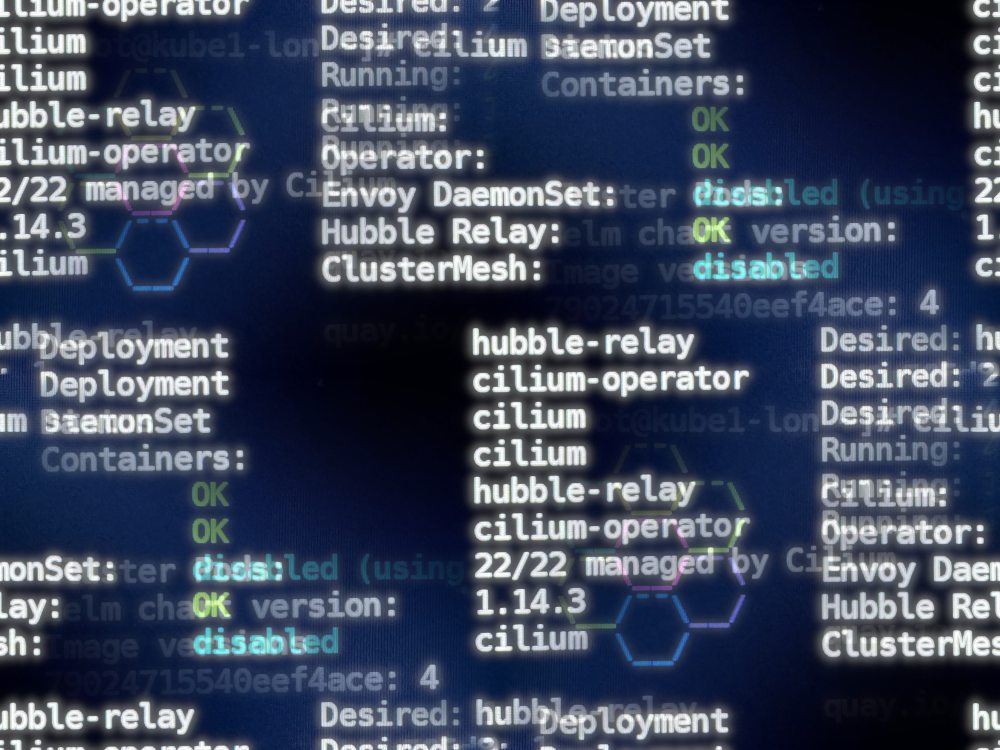
kubectl get pods --all-namespaces -o custom-columns=NAMESPACE:.metadata.namespace,NAME:.metadata.name,HOSTNETWORK:.spec.hostNetwork --no-headers=true | grep '<none>' | awk '{print "-n "$1" "$2}' | xargs -L 1 -r kubectl delete podVerify things look good:
# check all kube-system pods are healthy
kubectl get pods -n kube-system

# check Cilium is using the right IP range for pods:
kubectl get cm -n kube-system cilium-config -o yaml | grep -i cluster
Step 9: create a real pod
The moment of truth!
# deploy an Alpine Linux image and drop to a shell
kubectl run -it --image=alpine:3.6 alpine -- sh
# ping an IP on the Internet (below is my blog)
ping 81.187.86.89
# resolve something
nslookup blog.abctaylor.com
# exit
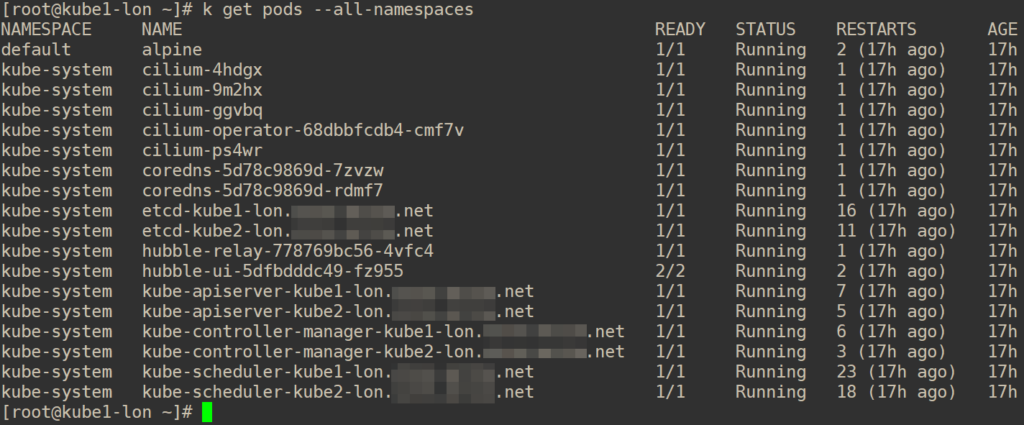
exitIf you check all pods running (k get pods -o wide --all-namespaces) you should see exactly this (with different random IDs of course):
I’d recommend doing another test reboot to make sure your new cluster survives!
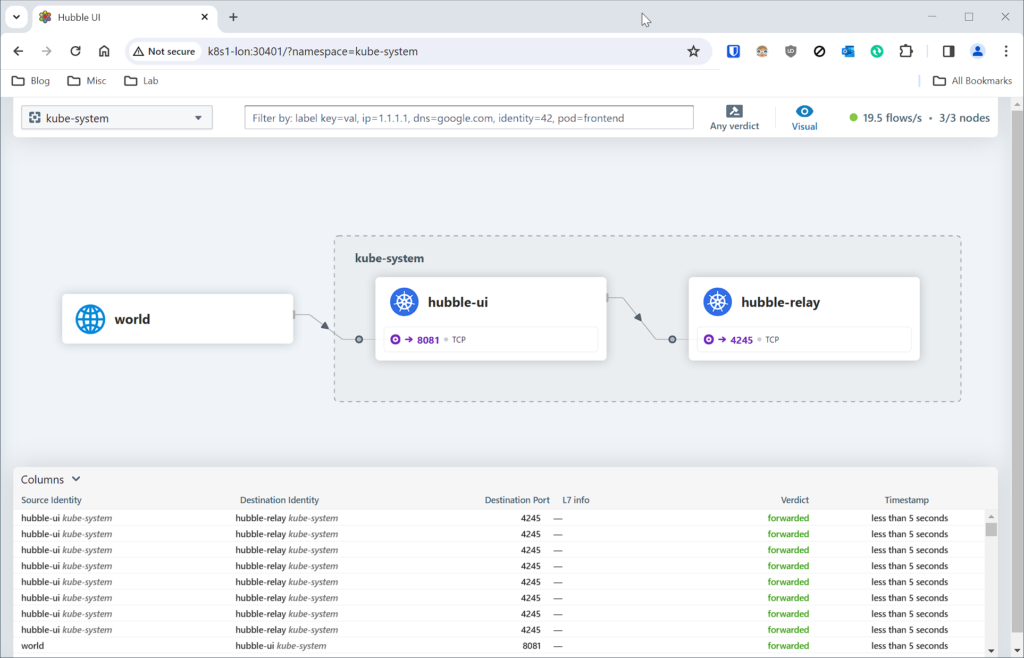
Step 10: enable Hubble (Cilium monitoring)
Earlier in the cilium.yaml file above, we added some config for Hubble. It made a pod called hubble-ui that runs a UI server. Currently somewhat insecurely due to a bug (I suspect with TLS in Cilium and the Hubble UI system). Let’s change the ClusterIP deployment to a NodePort, get the port and then open it in a browser:
# change hubble-ui's service ClusteIP to NodePort
kubectl patch svc hubble-ui -n kube-system -p '{"spec": {"type": "NodePort"}}'

# get the port allocated
kubectl get svc -n kube-system | grep hubble-ui
For example, my cluster allocated me :30401. Open it in Chrome on any node:
Thanks for reading!
This post took about two dozen fresh cluster builds to refine every little bit. Please contact me if you have any feedback.